
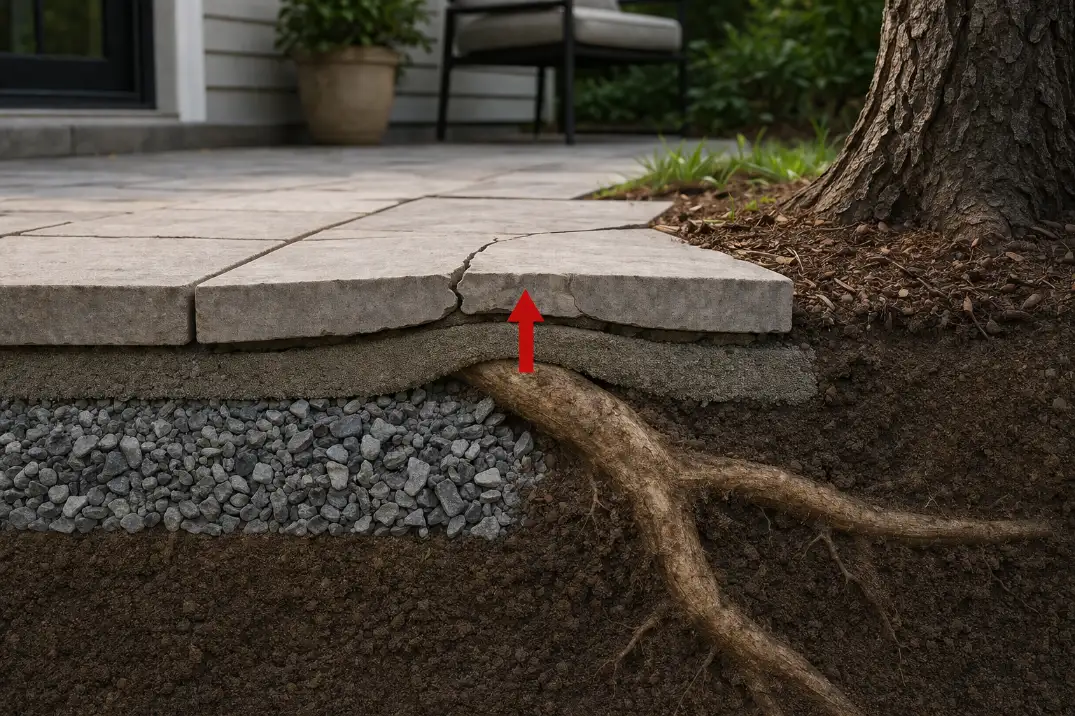
When patio tiles break near a tree, the tile is usually the symptom, not the cause. The more likely problem is root lift: shallow roots expand through the easiest soil or bedding layer, push the tile assembly upward, and crack the rigid surface where it can no longer flex.
The first checks are simple: a raised edge over 1/4 inch, cracks that repeat in a curved line from the tree side, and joints that widen again within 1–2 growing seasons.
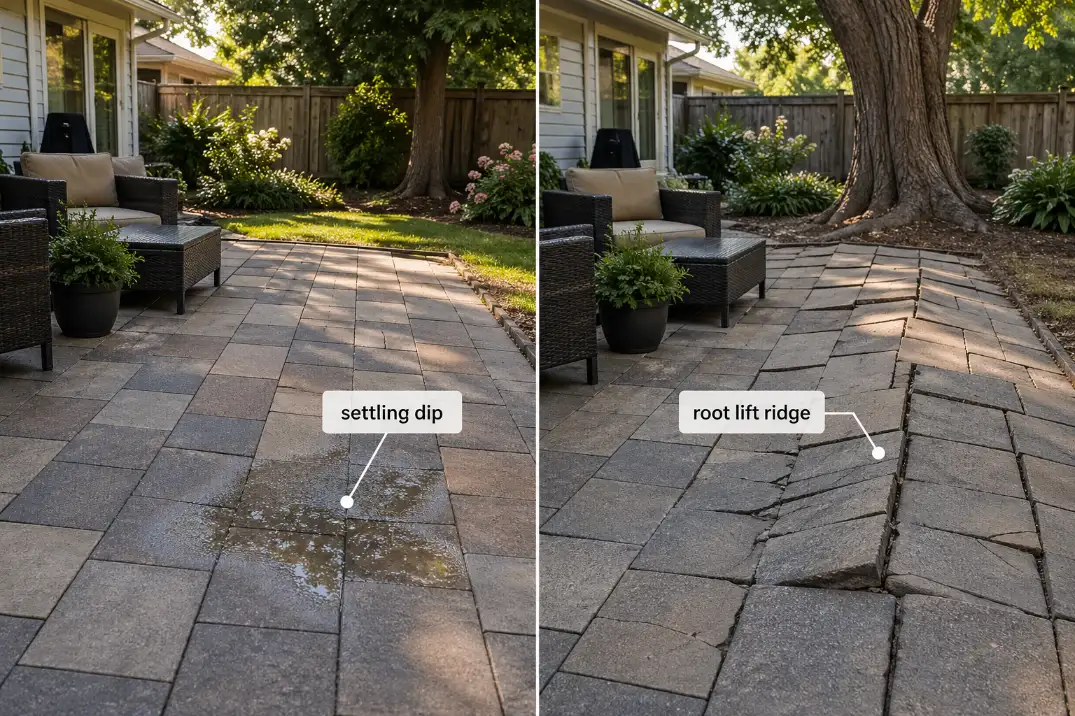
This differs from ordinary settling. Settling usually creates a low spot, rocking tile, or puddling after rain. Root lift creates ridges, tenting, and upward pressure.
If the same tile line breaks again after a surface repair, stronger grout or another replacement tile is unlikely to change the outcome.
The Quick Diagnosis: Root Lift or Settlement?
Look for upward movement first
Root lift usually announces itself as a high spot. One tile edge may sit proud of the next tile, or a row of tiles may form a slight ridge moving away from the tree. At 1/4 inch of height difference, the movement is worth correcting. At 1/2 inch or more, it becomes a practical trip hazard and usually means the base or layout has to change, not just the tile.
Settlement behaves differently. It pulls the surface downward, often leaving a dip where water sits for 24–48 hours after rain. That can still crack tile, but the repair logic is not the same. A sunken patio needs support and drainage correction. A lifted patio needs root-zone conflict control.
Cracks are clues, not the decision
A hairline crack alone does not prove root damage. Tile can crack from freeze-thaw exposure, poor mortar coverage, thin bedding, impact, or weak base preparation. Root lift becomes more likely when the crack line follows a curved or radial path and the highest point is closest to the tree.
This matters because a visible crack is only the failure signal. The mechanism is pressure below the tile. That is why the pattern discussed in Tree Roots Lifting Pavers and Creating Uneven Outdoor Surfaces is so relevant here, even though rigid patio tile usually fails faster and less forgivingly than loose-set pavers.
What Homeowners Usually Overestimate
Tile strength
A dense porcelain or stone tile can still crack if the support below it becomes uneven. Surface strength does not solve upward pressure. In fact, a stronger tile may simply transfer stress into grout lines or break later in fewer, sharper pieces.
Grout and adhesive repairs
Fresh grout can make the patio look controlled for a short time, but it cannot flatten an active ridge below the surface. Adhesive is not a leveling system either. If the underside is still being pushed up, rebonding one tile often buys only 6–18 months before the same area opens again.
Root barriers after the damage is already visible
Root barriers can help in the right situation, especially during new construction or when a patio edge is already open. They are much less useful as a magic fix after roots have already reached the tile field. If roots are beneath the damaged area now, the affected tiles still need to be lifted and the base inspected.
What Homeowners Usually Underestimate
Moisture along the patio edge
Roots follow better growing conditions. A downspout, irrigation head, leaky hose bib, or shaded low edge can make the patio base more attractive to roots. If the tree-side joint stays damp for more than a day after ordinary rain, water is helping the problem continue.
That is one reason root lift and drainage failure often overlap. A patio may start with shallow root pressure, then worsen as open joints collect water and weaken the bedding layer. The same drainage logic behind Drainage Patterns That Damage Patios and Walkways applies when water keeps feeding the root-side edge.
How shallow the conflict can be
Many absorbing roots grow in the upper 12–18 inches of soil. That is exactly where patio bedding, compacted aggregate, disturbed backfill, and moist edge zones often sit. The root does not need to be huge to start movement; it only needs to create a high point under a rigid surface.
Pro Tip: Do not cut exposed roots just because they are visible. Roots over about 2 inches in diameter, especially close to the trunk, may be important for tree health or stability.
Tile, Paver, or Slab: Why the Surface Type Changes the Fix
Not all hardscape reacts to roots the same way.
| Surface type | How root lift usually appears | Repair flexibility |
|---|---|---|
| Mortared patio tile | Cracked tile, popped grout, sharp lifted edge | Low; base conflict must be corrected |
| Sand-set pavers | Uneven blocks, open joints, rocking pieces | Moderate; can often be lifted and reset |
| Concrete slab | Long crack, raised panel, trip lip | Low; may require cutting or replacement |
| Natural stone tile | Cracks along weak veins or edges | Low to moderate, depending on installation |
| Gravel or flexible edge | Minor heaving or displacement | High; easier to reshape |
This is where patio tile is unforgiving. A sand-set paver system can sometimes tolerate small movement because individual units can be lifted, leveled, and reset. A rigid tile assembly cannot absorb the same pressure without cracking.
If your patio also has loose pieces and widening gaps, Loose Patio Stones Forming Gaps After Ground Settlement helps separate root lift from support loss.
Why the Obvious Fix Fails
Replacing broken tiles does not remove the pressure
A replacement tile may look perfect on day one. But if the root, raised bedding, or moisture pattern remains, the new tile is sitting over the same force that broke the old one. The repeat failure often shows up after a wet season, a freeze-thaw winter, or the next spring growth period.
In northern states, open joints can collect water and freeze, widening cracks as temperatures cycle above and below 32°F. In humid parts of Florida or coastal California, the same open joints may stay damp long enough to weaken bedding and encourage organic buildup. Different climates change the speed of failure, not the basic mechanism.
Stronger material is not the same as a better assembly
This is the common mistake. People upgrade the tile without fixing the support. But outdoor surfaces fail as systems: tile, bond coat, bedding, base, soil, slope, water, and nearby roots all matter. If the hidden layers remain unstable, premium tile can still fail early. That broader system view is covered well in Why Surface Materials Fail Early.
The Repair Path That Actually Makes Sense
1. Measure and mark the movement
Use a straightedge or 4-foot level across the damaged area. Mark the highest tile edge, the crack line, and any widened joints. If the lift forms a ridge pointing back toward the tree, root pressure moves higher on the diagnosis list.
Also note timing. A crack that returned within 1–2 seasons after repair is more important than an old isolated crack that has not changed in years.
2. Open only the affected zone first
Do not demolish the whole patio just to investigate. Remove the broken tiles and the highest nearby pieces first. The goal is to expose the pressure point. Sometimes the culprit is a woody root. Sometimes it is a compacted hump, buried construction debris, thin bedding, or washed-out material beside a root corridor.
3. Decide: prune, bridge, set back, or redesign
Small feeder roots may be pruned when they are not close to the trunk and not part of the tree’s major support system. Larger roots need more caution. A root over 2 inches in diameter, a root within roughly 3–5 feet of the trunk, or several roots on the same side of the tree should trigger arborist review before cutting.
There are four realistic choices:
| Damage pattern | Better repair choice | When not to use it |
|---|---|---|
| Small root, minor lift under 1/4 inch | Local reset and base correction | If the crack line is still widening |
| Feeder roots in loose bedding | Careful root pruning and rebuild | If roots are large or close to trunk |
| Mature tree tight to patio edge | Set back tile edge with mulch or gravel buffer | If you need a perfectly rigid edge |
| Repeated cracks over same line | Redesign affected section | If only one old crack exists |
| Large root under main walking path | Arborist plus layout change | If cutting would destabilize the tree |
4. Rebuild the base, not just the surface
Once the pressure point is handled, rebuild the support layer. Remove loose bedding, recompact the area, and correct the slope. A pedestrian patio commonly needs a compacted aggregate base in the 4–6 inch range, but root-prone edges may need more depth, separation fabric, and a more forgiving transition.
Aim for a surface slope around 1/8 to 1/4 inch per foot where drainage is needed. That is enough to move water without making the patio feel sharply tilted.
5. Use separation where the tree will keep growing
If the tree stays, the patio should stop pretending the root zone is static. A 12–24 inch setback, mulch strip, gravel band, or flexible paver transition can protect the main tile field from future lift. Around mature trees, this often outperforms rebuilding the tile tight against the same root path.

When a Root Barrier Helps
A root barrier is most useful before the problem reaches the patio field or when you are already rebuilding the edge. It should not be treated as a thin strip pushed into the soil after the fact. For a barrier to matter, it generally needs enough depth to redirect roots below the hardscape zone, and the top must remain slightly above grade so roots do not simply cross over it.
A barrier also has limits. It may redirect future feeder roots, but it will not flatten a lifted tile, remove existing root pressure, or correct a weak base. If the patio is already cracked, root barrier work belongs after inspection and before rebuilding, not as a standalone surface fix.
When Replacement Beats Repair
Local repair makes sense when the lift is small, the root conflict is limited, and the crack pattern has not repeated. Replacement or redesign becomes smarter when more than 20–25% of the patio is affected, when a raised ridge crosses a main walking route, or when the same tile line has failed twice within 2–3 years.
The more mature the tree, the less sense it makes to keep forcing rigid tile into the root zone. In those cases, a redesigned edge can be the more durable and more tree-safe repair. The goal is not to defeat the tree; it is to stop placing a brittle surface where movement is predictable.
Questions People Usually Ask
Can I cut the root and put the tile back?
Sometimes, but only after identifying the root size and location. Small feeder roots may be manageable. Large roots near the trunk should not be cut casually because they may affect tree health or stability.
Will thicker tile solve the problem?
Not by itself. Thicker tile can still crack if the base lifts unevenly. The support layer and root conflict matter more than the tile thickness.
Is this the same as normal patio settling?
No. Settling usually creates low spots. Root lift creates high spots. Both can crack tile, but they require different repairs.
Should I remove the tree?
Only when the tree is unsafe, poorly placed, repeatedly damaging important structures, or not worth preserving. For many patios, a setback edge or flexible transition solves the surface problem without removing a healthy shade tree.
Bottom Line
Patio tiles breaking from tree root lift are not mainly a tile-quality problem. They are a conflict between a rigid surface and a living root zone.
The repair that lasts is the one that confirms the lift pattern, protects important roots, rebuilds the support layer, controls moisture, and gives the patio edge enough room to stop fighting future growth.
For broader guidance on managing tree roots near paved areas, see Iowa State University Extension and Outreach.